Thursday, January 15, 2009

Tracking Visitors' Location With Traffic Map

In previous tutorial, you have known how to know the total visitors of your blog with a visitor counter. Anyway, do you want to know what country or city they came from? If you want that, you can use a tool that we call traffic map.

Get & Copy The Code

First, you have to go to http://feedjit.com/joinjs/. On that page, you will find four nice gadgets for your blog. Choose the one named Live Traffic Map and copy the HTML code.
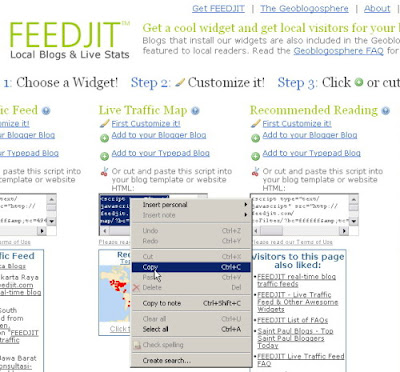


Paste It To Your Blog

Now, you can log in to blogger. In your blogger dashboard, click Layout then click the Add Widget link and the popup window will appear. You should choose HTML/Javascript option then another popup windows will be shown. On that window, you can give the title for your traffic map like Traffic Map or another name. Then, paste the HTML code to the textarea. Click save when you're done.

You can see the detail of these steps in my previous tutorial about adding visitor counter.
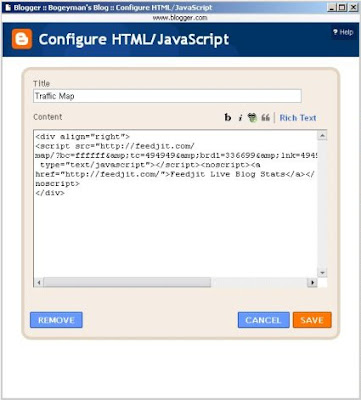


Manage Its Place

You have added the traffic map to your blog. Now, you can manage its place by dragging and dropping it to your desireable place. If you feel statisfy about it, you can click Save.

You can also see the screenshot of this process in my previous tutorial about adding visitor counter.

Test It

Now, open your blog and its traffic map may be looked like this.


The red spots are the location of your visitors. If you want the detail information like country and city name, you can point to one of those red spots with your mouse.


Sunday, January 11, 2009

Adding Visitor Counter To Your Blog

Visitor counter is a web component which can inform you about how many times your website has been visited. Visitor counter is a very usefull tool to measure your website's popularity. You can also add a visitor counter to your blog to see how popular your blog is. In this tutorial, I want to show you how to add a visitor counter to your blog.

Get A Free Counter
First thing you have to do is get a free counter from the internet. In this tutorial, I use a free counter from free-counter-plus.com. To get a free counter from free-counter-plus.com, you just need to enter your website address and from what number your counter will be started. After that, choose the style of counter you preferred. See the picture below.


Copy The Code
Click on Sign Up button, then you will get the HTML code for your counter. Don't worry if you don't understand about HTML, you just need to copy that code.


Add Gadget and Paste The Code
Log in to your blog, in this example I use blogger.


In blogger dashboard, click on Layout link then the page below will be shown.


Click on Add Gadget link then the popup window below will appear.


Scroll down on that window and find HTML/Javascript option. If you have found it, click on the plus sign. After that, a window like this will be shown.


Give the title for your counter like Total Visitors or something else. Then paste the HTML code to the content textarea. If you understand about HTML, you can also costumize it. Click Save to add new gadget to your blog.

Manage Your Layout
You can decide where your visitor counter will be placed. You can do it by dragging and dropping your gadget to the appropriate place.


Click Save when you're done.

See The Result
Now, open your blog to see the result of your work.

Monday, December 29, 2008

Installing RPM Files On Slackware Based Distributions

RPM is a very famous software package manager in Linux platform. RPM stands for RedHat Package Manager which means it will work well with RedHat based distributions such as Fedora, Mandriva, or SuSE. Is it possible installing RPM (.rpm) files on the other distribution base like Slackware or Debian? Yes, it is very possible. In this tutorial, I will show you how to install XCHM (CHM files viewer for Linux) RPM on Vector Linux (This is the Slackware based distribution). By the way, I used XCHM version 0.9 and it needs at least wxGTK version 2.4. If you use XCHM version 1.0 or above you need wxGTK 2.6 or newer.
  1. I assume you have downloaded such files : xchm-0.9.7-1.i586.rpm and chmlib-0.35-1.1.fc2.dag.i386.rpm. You can find them with Google.
  2. Login to your console as root.
  3. Use rpm2tgz command to convert those RPM files into TGZ (.tgz) files. Slackware use TGZ files as its software package manager. Just type the command rpm2tgz xchm-0.9.7-1.i586.rpm and wait until the conversion process finish. Then convert the second RPM files with the same command rpm2tgz chmlib-0.35-1.1.fc2.dag.i386.rpm and wait until the process finish.
  4. Install the chmlib first with command installpkg chmlib-0.35-1.1.fc2.dag.i386.tgz.
  5. Then install the xchm with command installpkg xchm-0.9.7-1.i586.tgz.
  6. Try to run the application by typing xchm in your console.
You can use RPM command as well in Slackware, but it is strongly recommended if you convert it to TGZ file first, then install it with installpkg command. If you want to remove that program you can use removepkg command followed by your package name or you can use pkgtool program which has an ncurses based interface. Anyway, what if you use the Debian based distribution like Ubuntu? You can use the same steps, but you have to replace the rpm2tgz command with the alien command. That command will produce DEB (.deb) files. And to install them just use apt-get --install command followed by your DEB file name.

The XCHM

Tuesday, November 18, 2008

How To Reset MySQL Root Password

Do you forget your MySQL root password and can't login? Don't panic. You don't have to re-install your MySQL as long as you still have the privileges to start and stop the MySQL service. Just follow these instruction:

1. Stop your MySQL service.
2. Start your MySQL service with this following command:
mysqld --skip-grant-tables

This command will start your MySQL service without checking the users tables everytime users login. So, you can login as root and reset your password.
3. Update your root password with this command.
USE mysql;
UPDATE user SET password=PASSWORD('new password') WHERE user='root';
4. Refresh the users' privileges.
FLUSH privileges;

Now, your MySQL root password has been updated with the new password. You can login to MySQL with that new password.

Tuesday, November 11, 2008

Paging In Oracle

Oracle doesn't have the LIMIT keyword like MySQL. So, how can we do paging in Oracle? There is a little trick to do it.

Let's assume there is a table named table1 and it has two fields such as trans_id and user. When we execute the SELECT statement, the result will be like this:
SELECT trans_id, user FROM table1 ORDER BY trans_id;

TRANS_ID USER
----------- ------
080003 001
080003 001
080003 001
080005 001
080005 001
080024 002
080024 002
080025 001
080151 001
080151 001
080296 001
080296 001
080413 003
080427 ADMIN

First step to do the paging is we will use that result as a table. The trick will start here. We're going to add a new field to display the row number for the result. The row number will be our key to do the paging. So, the query and its result will be like this:
SELECT rownum rn, t1.* FROM (SELECT trans_id, user FROM table1
ORDER BY trans_id) t1 ;

RN TRANS_ID USER
----- ----------- ------
1 080003 001
2 080003 001
3 080003 001
4 080005 001
5 080005 001
6 080024 002
7 080024 002
8 080025 001
9 080151 001
10 080151 001
11 080296 001
12 080296 001
13 080413 003
14 080427 ADMIN

Next step. Based on the result, we will use it as a table. Then use the rn field to do the paging. For example we're going to show only the top five of the result. So, our query will be like this :
SELECT * FROM (SELECT rownum rn, t1.* FROM (SELECT trans_id, user FROM table1
ORDER BY trans_id) t1) t2 WHERE rn BETWEEN 1 AND 5;

RN TRANS_ID USER
----- ----------- ------
1 080003 001
2 080003 001
3 080003 001
4 080005 001
5 080005 001