Thursday, April 23, 2009

Formatting HTML Table Rows With Javascript

If we are working with PHP we can easily formatting even and odd table row's color with looping. But, what if we are working with the pure HTML table? Can we format even and odd row with different color without typing it manually inside the <tr> tag? Yes, we can. Just use Javascript to do that job.

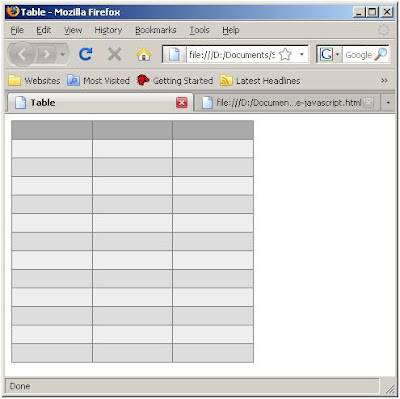
The basic concept is we must loop through the all of the rows of an HTML table that we want to format and then add the class attribute for each row. That class attribute will contain the name of CSS class for an even or odd row.

Sample Code

This the sample code.

<html>
<head>
    <title>Table</title>
    <style type="text/css">
        /* DEFINE THE CSS CLASSES */
        .table_header{
            background-color:#AAAAAA;
            color:#FFFFFF
        }
        
        .even{
            background-color:#DDDDDD;
        }
        
        .odd{
            background-color:#EEEEEE;
        }
        
        #table1{
            background-color:#777777;
        }
    </style>
    <script language="javascript" type="text/javascript">
        /* THIS IS THE FUNCTION FOR FORMATTING ROW */
        function formatRow(table_id){
            var table=document.getElementById(table_id);
            for(var i=1;i<table.rows.length;i++){
                var className="";
                if(i%2==0){
                    className="even";
                }
                else{
                    className="odd";
                }
                
                table.getElementsByTagName("tr")[i].className=className;
            }
        }
    </script>
</head>
<body>
    <table width="300" id="table1" border="0" cellspacing="1">
        <tr class="table_header"><th>&nbsp;</th><th>&nbsp;</th><th>&nbsp;</th></tr>
        <tr><td>&nbsp;</td><td>&nbsp;</td><td>&nbsp;</td></tr>
        <tr><td>&nbsp;</td><td>&nbsp;</td><td>&nbsp;</td></tr>
        <tr><td>&nbsp;</td><td>&nbsp;</td><td>&nbsp;</td></tr>
        <tr><td>&nbsp;</td><td>&nbsp;</td><td>&nbsp;</td></tr>
        <tr><td>&nbsp;</td><td>&nbsp;</td><td>&nbsp;</td></tr>
        <tr><td>&nbsp;</td><td>&nbsp;</td><td>&nbsp;</td></tr>
        <tr><td>&nbsp;</td><td>&nbsp;</td><td>&nbsp;</td></tr>
        <tr><td>&nbsp;</td><td>&nbsp;</td><td>&nbsp;</td></tr>
        <tr><td>&nbsp;</td><td>&nbsp;</td><td>&nbsp;</td></tr>
        <tr><td>&nbsp;</td><td>&nbsp;</td><td>&nbsp;</td></tr>
        <tr><td>&nbsp;</td><td>&nbsp;</td><td>&nbsp;</td></tr>
        <tr><td>&nbsp;</td><td>&nbsp;</td><td>&nbsp;</td></tr>
    </table>
    <script language="javascript">
        /* FORMAT THE TABLE */
        formatRow("table1");
    </script>
</body>
</html>

How Does It Look Like?

Sunday, April 12, 2009

Detecting IP Address Behind The Proxy

This is the short tutorial for detecting the IP address of website's visitors. If you familiar with PHP, you can use the $_SERVER['REMOTE_ADDR'] superglobal variable to detect the visitor's IP address. What if the visitor is browsing from behind the proxy. Of course you will only get the proxy IP address not the real IP address of the visitor.

There is one more superglobal variable to detect the real IP address of the visitor. It is the $_SERVER['HTTP_X_FORWARDED_FOR'].

This simple program will demonstrate the detection of IP address and the IP address that "hidding" behind the proxy.

<?php
echo "<p>You came from <b>".$_SERVER['REMOTE_ADDR']."</b>.</p>";

if (isset($_SERVER['HTTP_X_FORWARDED_FOR'])) {
  if (preg_match("/^(25[0-5]|2[0-4][0-9]|[01]?[0-9][0-9]?)\.(25[0-5]|2[0-4][0-9]|[01]?[0-9][0-9]?)\.(25[0-5]|2[0-4][0-9]|[01]?[0-9][0-9]?)\.(25[0-5]|2[0-4][0-9]|[01]?[0-9][0-9]?)$/i", $_SERVER['HTTP_X_FORWARDED_FOR'])) {
    echo "But, your real IP address is <b>".$_SERVER['HTTP_X_FORWARDED_FOR']."</b>.";
  }
  else{
    echo "But, your real IP address is unknown.";
  }
}
?>

This is the screenshot while the script was running.


Monday, April 6, 2009

Creating The Web Services Client (Part 3)

We have created the desktop and web applications as the clients of web service. There one more application that we are going to create. The mobile application. This mobile application is based on Java (J2ME).

The Code

You need a supporting library to make your job easier. In this tutorial, I will use the Wingfoot SOAP or WSOAP as the supporting library. You can download WSOAP from www.sourceforge.net. The other SOAP implementation for mobile application is KSOAP.

WSOAP came in zipped file. Inside the zip file there are two essential files such as kvmwsoap_1.06.jar and j2sewsoap_1.06.jar. The one that we are going to use is the first one. So, copy the kvmwsoap_1.06.jar file to the lib folder inside your J2ME project folder.

import javax.microedition.midlet.*;
import javax.microedition.lcdui.*;
import com.wingfoot.soap.*;
import com.wingfoot.soap.encoding.*;
import com.wingfoot.soap.transport.*;

public class wsclient extends MIDlet implements CommandListener,Runnable{
    private Form form;
    private TextField txtName;
    private StringItem strResult;
    private Command cmdOk;
    private Command cmdExit;
    private Display display;
    
    public wsclient(){
        form=new Form("Web Service Client");
        txtName=new TextField("Name","",10,TextField.ANY);
        strResult=new StringItem("","");
        cmdOk=new Command("Ok",Command.OK,1);
        cmdExit=new Command("Exit",Command.EXIT,2);
        
        form.append(txtName);
        form.append(strResult);
        
        form.addCommand(cmdOk);
        form.addCommand(cmdExit);
        form.setCommandListener(this);
    }
    
    public void startApp(){
        display=Display.getDisplay(this);
        display.setCurrent(form); 
    }
    
    public void pauseApp(){
    }
    
    public void destroyApp(boolean unc){
    }
    
    public void commandAction(Command c, Displayable d){
        if(c==cmdOk){
            new Thread(this).start();
        }
        if(c==cmdExit){
            destroyApp(false);
            notifyDestroyed();
        }
    }
    
    public void run(){
        try{
            // THE LOCATION OF WEB SERVICES
            String url="http://localhost:8080/axis/services";
            
            Call c=new Call();
            
            // SET THE THE METHOD NAME, SERVICE NAME, AND THE INPUT PARAMETER
            c.setMethodName("greeting");
            c.setTargetObjectURI("helloService");
            c.addParameter("name",txtName.getString());
            
            HTTPTransport transport=new HTTPTransport(url,null);
            transport.getResponse(true);
            
            // CALL THE WEB SERVICE
            Envelope res=c.invoke(transport);
            
            strResult.setText("Response : " + String.valueOf(res.getParameter(0)));
        }
        catch(Exception ex){
            strResult.setText(ex.toString());
        }
    }
}

Save this file with name wsclient.java under the src folder of your project.


Build and Run It!

Build your application and run it. This is the screenshot of this application while running.